Monday 10 January 2011

Completed pictures...

Finally the finished pictures...


Tying up loose ends.

All over with now, but I figured I'd post up the final in progress and complete photos that I did not have time to do a month ago..


Close up detail of the finished cladding. Decided to paint it two tones of yellow to add a bit of brightness to an otherwise dull building. The two tone idea was due to the real building having two shades of grey.

An over view of the building. The roof viewing area will be added later.

The blob recieved two coats of a blue I mixed up after polishing the primer. When the blue started curing, I then sprayed 2 coats of green tinted clear lacquer to try to get a translucent green 'skin' of green. This was then covered in another 3 layers of clear lacquer.

All these coats were allowed to dry for 24 hours before being polished back using fine grades of polishing compound (a very fine liquid sandpaper) to get the mirror-like shine.

Another shiny picture. The pedestals underneath also recieved a coat of white.


An overview of the model at this stage in construction. The river back has been cut down to size and painted green and a layer of clear 5mm acrylic has been measure out and cut to size for the waters surface. The back side of this is then sprayed a similar blue to the Kunsthaus. This creates a smooth, reflective water surface with a slight amount of depth.

A picture illustrating the viewing platform. This was cut out from a block of clear acrylic, cladded on the top and bottom with a 1mm layer of styrene, cut back to size, polished and then the window frames were scribed using a needle in a pin vice.

As the pictures demonstrate, the sanding and polishing really paid off. The reflections and shine add a lot to the model, further contrasting with the matt, wooden finish of the surrounding buildings.

Tuesday 30 November 2010

4...

Lots done today, but not many pictures to show what exactly..

I began straight away on the two buildings that form the rest of the Kunsthaus. I decided because they are the same style as the contextual buildings that surround them, I'd build them in a similar style, using layered wood to represent their traditional construction...


The two aged looking buildings at the bottom/left..

However, instead of using the layered technique as the core of the building, I used chemiwood and then stuck a thin, 1mm veneer of the the layered wood. The other sides were then clad with styrene.


The wooden sides showing off the layered wood cladding.
This creates a nice effect of traditional/modern and links the buildings with their old and new surroundings.

The styrene clad sides. You can see the thickness of the wooden veneer in this shot.
I enjoyed the process and the final result has a very nice finish to it.


Other things completed today included getting the river bank clad with styrene .I have decided against painting the bare wood green and I think any part that will recieve colour will need to be cladded. I think this will create a better finish and like the idea of having the majority of the baseboard a natural wood colour with only the Kunsthaus and its buildings, the river, the river bank and its trees being coloured. The bank will be sprayed tomorrow.

I did not manage to get the iron building painted today but this has been prepped along with the Kunsthaus pedestals (which also recieved locating pins) for painting first thing tomorrow.

Also, the Kunsthaus blob recieved its first lick of paint. I spent the majority of last night polishing the primer to a high shine so the coat went down very smoothly. This will dry tonight in preparation for a couple of coats of clear lacquer tomorrow morning and then T-cutting tomorrow evening.

Whilst this was happening, I also sprayed the clear acrylic which will represent the river mur the same colour. This will be stuck down tomorrow.

Monday 29 November 2010

5...

Lots of stuff done today.

Firstly the iron building core was finished. This was made from a block of clear acrylic and then layered with chemi-wood and styrene to get the strange angles of the building.

The transparent sides were polished and covered with masking tape for protection.

I then made the roof out of 0.5mm styrene. The center was then sliced out to be replaced by wood veneer.


A slice of wood veneer will go in the middle.
I managed to snap a couple of pictures of the brass sheet containing the pieces I will be using.

Lots of spares!
  It's 0.10mm thick but the detail is incredible (and also very delicate!)

Extreme macro close-up!
I am very pleasantly surprised that the railings have come out so well. They'll be one hell of a job to get on the model but hopefully worth the effort.


 Back to the iron building..

The bits together...

I couldn't resist seeing what the brass would look like attached. This will be sprayed a cool blue colour tomorrow. The wooden veneer adds a bit more interest.

As for the blob, well it's being sanded and primed and sanded and primed and sanded...

Mmmm smooooooth..

...and ever so slowly getting to a stage where I think it'll be ready for its first coat of blue.


All three of the pedestals have also been cladded. I think these will be left white..

This will be followed by a couple of coats of clear lacquer (possibly tinted slightly green) and then polished further using T-cut to leave it with a mirror shine.


And here's the model put together. The viewing station and top area of the iron building still needs to be shaped and polished, the river needs putting in, the two other buildings next door to the Kunsthaus need to be made and also the trees. A lot to do and not enough time to do it!

Thursday 25 November 2010

Under pressure

Another 12 hour day today, this time spent wrestling with clear acrylic!

I am now prioritising things that absolutely need to be finished on time. This basically means the Iron Building at the front of the 'blob'. I want to have the core of the building finished so that when the brass etching arrives, it should just be a case of spraying it and slapping it on...


...but before I get to that, I also had to make a couple of other alterations.

As it stands now..

The viewing platform needs a groove in the blob to sit in so that was the first thing done. I used the same parcel tape/ body filler technique as I did for the pedestals yesterday. This time it was just a case of creating a long, thin former (I left the former in the workshop so no pictures I am afraid!) and wrapping it in parcel tape. I then roughly gouged out the groove in the side of the blob with a dremel and filled it generously with body filler. The former is then pushed in and held to the correct angle and height whilst the filler sets and the excess is trimmed away...

Next up, detailing the pedestals.

One cladded pedestal...

The large rear pedestal has a faceted outer layer which I tried to recreate by scoring thin styrene and then wrapping it around. It is then trimmed and you're left with a nice, white, textured pedestal ready for painting.

2 more left to go!

Unfortunately it ends there as my attention turned to more pressing issues...

Nasty texture...

...namely that of what to do with the Iron building and the viewing platform. After consulting my tutors, I tried vacforming the viewing tower. The shape was cut out of chemi-wood (but to a much larger height - this is to prevent webbing of the plastic...which happened anyway) and thrown in the vacformer. The pictures show that not-so-good outcome of the experiment and it's back to the drawing board.

....and even nastier clarity!

Tomorrow I will try the clear block of Acrylic which I have used for the iron building. This has nicer clarity and should be simpler to construct.


From the photos you will see the iron building has been started. The two sides not receiving brass etched detailing have been cladded in 1mm styrene and more layers of detail will be added to the sides and roof tomorrow.

I hope to have this building finished early next week so I can concentrate on the trees, water, viewing platform and the glass wrapping around the lower parts of the blob next week...lots to do!

Wednesday 24 November 2010

Getting closer

A big update but no time to properly describe what I have been doing...

I have been trying to get the blob so that it sits on 3 pedestals. I achieved this by using car body filler and parcel tape. The rough shapes of each pedestal are cut out according to my drawings (and to the right height) and placed in their positions. I tape the blob in the areas that are going to be touching the car body filler.

The body filler is applied to the top of the pedestals and then the blob is pushed down on top...

Blob showing car body filler squeezing out from the sides of the pedestals
 ...The body filler oozes out the sides and this is left to set and then sanded back flush with the pedestals. The parcel tape prevents the filler from sticking to the blob.

A couple of gaps left to fill on this side...

This leaves a nice pedestal which should fit flush with the contours of the blob.


...but perfect on this side.
 The pedestals will then be cladded with thin styrene ready for painting. Easy!

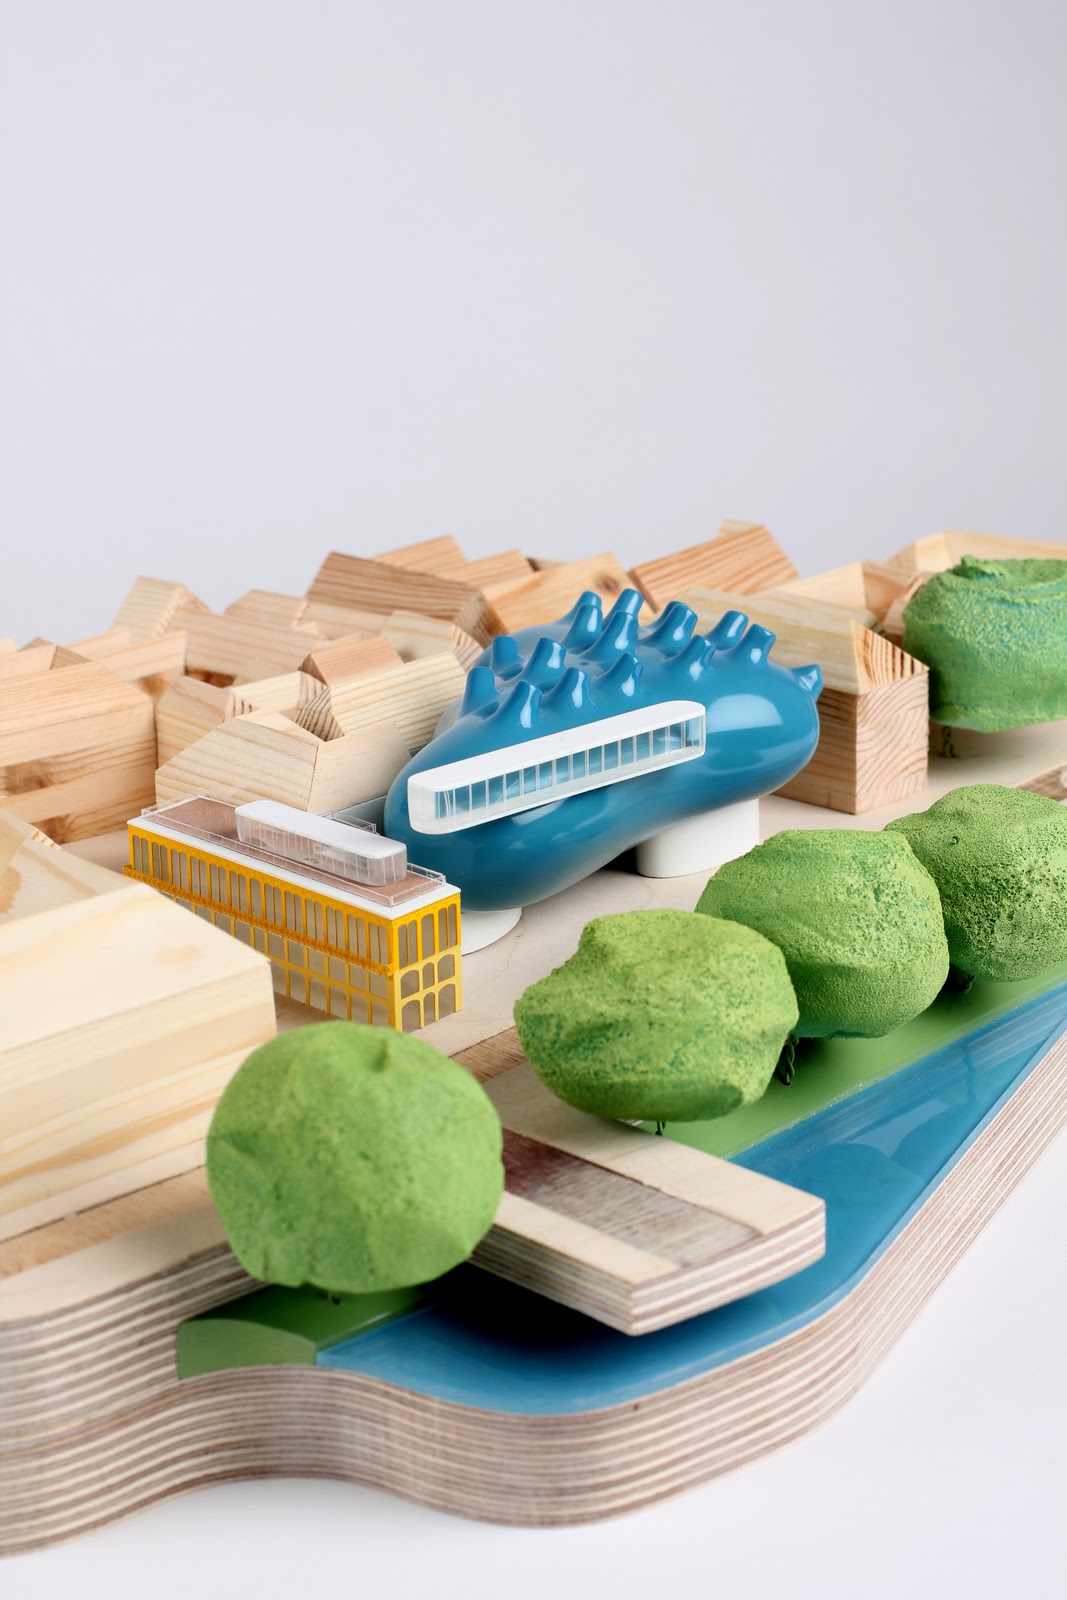
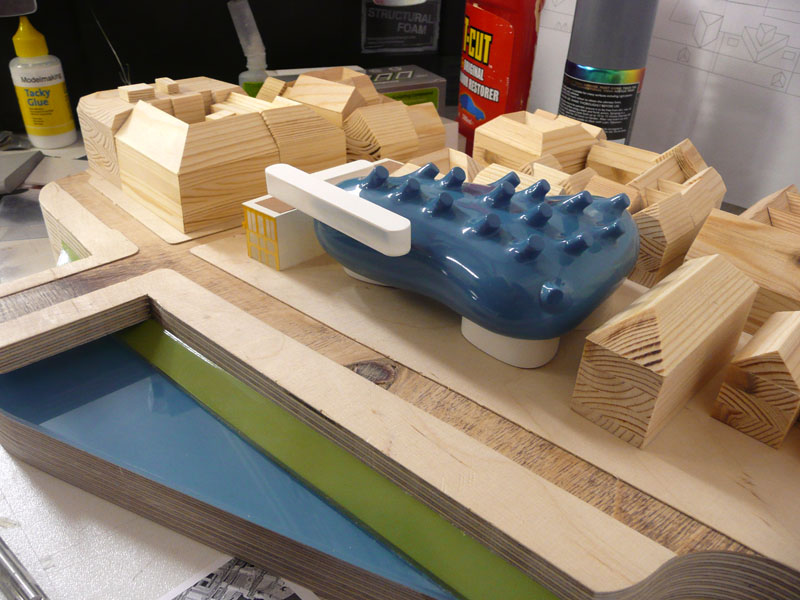
The baseboard also recieved a trimming to its final shape. I chose plywood because of its nice surface finish (I think it goes well with the natural pine wood houses) and also the properties of its layers.


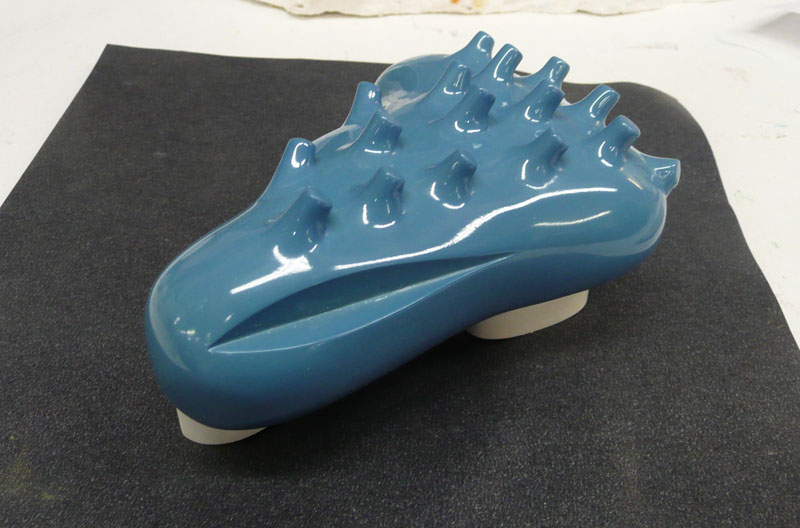
The Kunsthaus Graz blob shaping is finished. I will spend the weekend priming, sanding and polishing it to bring it to the high-gloss finish I want. The Iron House building at the front of the blob will also be started as soon as the brass etched cladding arrives (hopefully friday or first thing monday) The glass which wraps around the blob will also be started (I plan on using a similar car body filler/ parcel tape method to get it to tightly conform to the contours of the blob)


In these pictures you can also see the river bank piece sticking out of the base. This will be trimmed back and will hold the trees which will go along the shoreline.


Speaking of trees, I have also been experimenting to try and find a cool, 'blobby' way of creating some so that they stay in the style of the Kunsthaus Graz.

These were created from twisted wire (which forms the trunk and branches) and clear polyester resin poured into a ping-pong ball.

The outer shell of the ball is then sanded away (as I couldn't get it out!) and then buffed back.


As you can see it's not quite what I want. Dirty and cracked looking trees don't really go with the aesthetic of this model! The one on the right was pigmented red just for fun, but I gave up finishing it off after seeing the result of its neighbour.


Finally, the colours of the trees and water are of concern. I think the water will end up in this turquoisy colour, with the Kunsthaus Graz being a bluer version of it. The green trees and river bank will also be a pea-greeny colour.

Monday 22 November 2010

2 weeks left

A week later, I have just about finished the contextual buildings. There are a couple of bits still to do but they are 95% finito.

Today was spent trying to figure out what to do with the baseboard.

I have decided to go with a natural wood finish leaving the colour of the model in the Kunsthaus Graz, the river and the green trees which will all be finished in variations of blue and green.

I managed to get on the CNC mill to mill out the roads that are around the Kunsthaus.


The Beast.

On its first run, it milled off 0.4mm and another 0.1mm the second time. This leaves a nice smooth finish.


The last two shots show the surrounding buildings and the roughed out blob of the Kunsthaus in situ.

One thing that is immediately noticeable is the knot that was popped out of the plywood when the mill ran across it. I do not know whether to keep it or to start again with another chunk of ply. It is quite distracting.

Work continues on the skylights of the Kunsthaus and I hope to have it polished and nice by the end of the week. I am scrapping the moulding/casting plan for the moment as time is starting to run out.